
Adding Realism to Model Railroad Building Interiors
MRA Editors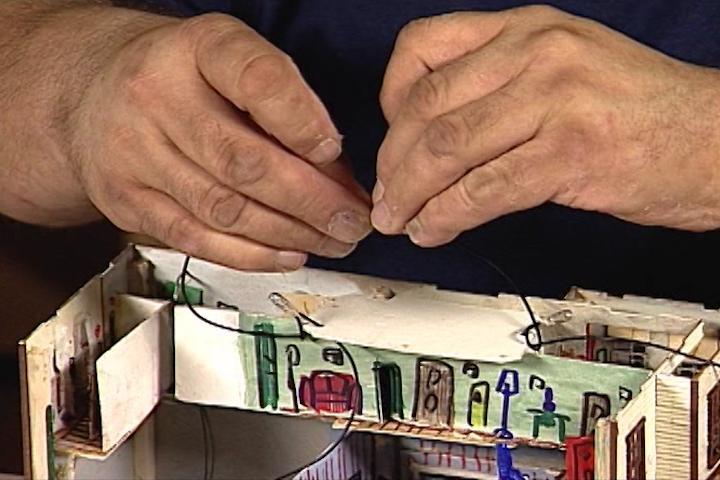
Video Player is loading.
Many modelers think when they finish building and painting a model railroad structures on the outside, the project is over and done. But modeler Mike Tylick shares some tips for adding model railroad building interiors that will take your layout to another level of realism.
Basically, Mike says, adding any kind of detail that can be viewed through the windows adds depth and realism to the scene. He shows how easy it is to add window shades and pull cords, and making curtains out of toilet paper or construction paper and simply gluing them to the interior. Painting your interior walls also makes it looks more “lived in,” as does using Sharpie pens to add picture frames, wainscoting and shelving. He stresses these don’t need to look professionally done; any crude sketching on interior walls will suffice. Look for after-holiday sales to pick up sets of inexpensive figures which you can glue to add “life” to your interiors.
He adds interior walls of scrap pieces of matt board to prevent “seeing through” a structure which can detract from the realism. When he adds ceiling to the rooms, he finds they’re a handy place from which suspend grain o’ wheat bulbs for interior lighting. Make sure you wire them in parallel, not in series, so that if one bulb burns out, the others will still light up. Also, old train transformers make a great power pack for lighting, and allow you to turn down the intensity of the bulbs to make them look more realistic – and the lights will last longer, too, at lower voltage.
Adding model railroad building interiors are fast, easy tricks with little artistic experience needed. They will help take your model railroad layout scenes to a new level of realism.
A great way to add realism to your model buildings and model railroads, is to add interiors to your structures. The interiors do not necessarily have to be highly detailed. The fact that something is inside, makes people think that there is an inside. One of the easiest things to do, is you add curtains and window shades to the windows. This only takes a few minutes.
I'll cut a few squares and just any sort of glue. This is yellow Carpenter's glue. It's not very neat, but don't forget, this is the interiors of a building and you're not gonna see this, but when you look through the window, it looks like there's a window shade. It hides a little bit to see inside. Another thing we would do for example, is we can, I've painted some of the walls already and just doesn't really matter what colors you use.
Just colors you think walls might be. Now to draw an interior, We do not have to necessarily be an artist, but you would just kind of draw what you think might be inside. Now I know downstairs here is going to be behind the bar. I've already glued a piece of plastic for a mirror so I'll just kind of draw a counter, you just kind of scribble it in. Now all good bars have Wayne's cutting on the walls.
So I'm just gonna keep drawing a little Wayne's cutting like that. And I guess you can't have a bar without Rosa bottles. So I'll just draw some bottles and these little permanent Sharpie markers are great. I found bright colors work really well on this. Seems that if you use the so-called correct dull colors, they come to dull.
So this is an old trick from elementary school when I was working, as a child would make a drawing and it didn't look very nice. So we always say, outline it with black and everything you outline with black looks better. And this is, you can see how easy it is to scribble these. Doesn't really have to look that good because once you look through the windows all you'll really see is the fact that there are things inside. You could also add additional realism by adding pull cords to the window shades.
These are very easily made by just taking very fine wire. I use strands of lamp cord and dipping them into glue and little blobs form. The curtains inside the windows are made by just cutting pieces of toilet paper, piece of construction paper. And the ultimate way is to cut curtains out of catalogs. And inexpensive figure sets are available at great discounts in hobby shops.
Good time to buy them is right after Christmas. These castings are not of a quality you'd want to put in the foreground, but they look great inside windows. For example, there a little people inside the bar, several seated people. The bartender is actually a fellow with a pick but I'll never use him anywhere else. You're not gonna see the pick.
And he looks a lot like washing glasses, I think. The fellow standing at the bar is a conductor with his lantern cut off because it seems every set gives you too many conductors and you have a lot of figures you're never gonna use. And it just gives you a little extra detail inside the building. And that's a simple step but since we're becoming a little more elaborate, I built a little room. The details in the rooms and the details inside are just bits of that cardboard, matte board I use, I use scrap of matte board from framing shops and those are just colored with marker to resemble furniture and just glued to stand up, there's no back on them.
If you look from the top, they're just flats but a piece like this, for example, would be glued on the back of the wall. And the floor in the Selena's Tavern was made with a computer. And so a simple matter to cut and paste to square and replicate the floor. This also brings up the possibility of using photography and photographing buildings. In this case, however, I've joined the computer floor and on the back we have, you can see the floor better.
Alternately, I could have just taken the square and drawn the floor by hand. And the next step to keep that room light tight is to put a ceiling on top. Now the ceiling, I decided would make a convenient way to hold the interior lighting. Grain of wheat bulbs do not require much support. They're really just sitting there.
So I just punched little holes and I will just take little bulbs and I will tie them around each other. A little knot like this with some glue later would be all they really require. There's no limits to the number of bulbs you might use. I like to be redundant. I figure if a building has several bulbs, I am better off having several bulbs, the light is more even.
If the lighting is more even, it looks better. Always run these, operate these light bulbs, at a reduced voltage. They last many, many times longer, because essentially once one of these bulbs burns out, they're never gonna be replaced. Very few light bulbs will give you enough light where you can practically read the newspaper. So use them very sparingly and use them very dimly.
And if you have ever had the experience of a light bulb burning out in a Christmas tree, you know you do not want to wire these light bulbs in series. That means the wires go from one to the next. And when one burns out, the circuit is broken. What you want to do, is wire them in parallel, which means that the electricity goes to each one separately. That sounds more complicated than it is.
Essentially, you would take one wire from each bulb and twist it together. And if I tie one wire from each, and then I tie one wire, the second wire from each, each one will get electricity separately. That way, if one light bulb burns out, then the rest of them will still work. And once you have your light bulbs tied together, you have to bring the electricity from the railroad to your building. A simple way to do this, is just drill a few holes in the bottom of the building.
These are kind of small and neat but anything that the wires can get through will work. I'll give it an extra twist just as a strain relief. And that's all you really need to hold it in place. So we'll just twist this together. And now we are assembled.
The next step would be soldering the wires for permanent connection and either taping, or heat shrinking them. That way, something as simple as adding interior lighting to your structures and street lamps, adds a whole new dimension to your model railroad.
It would help if we could see the end result!
Isn't that special!